Snacks
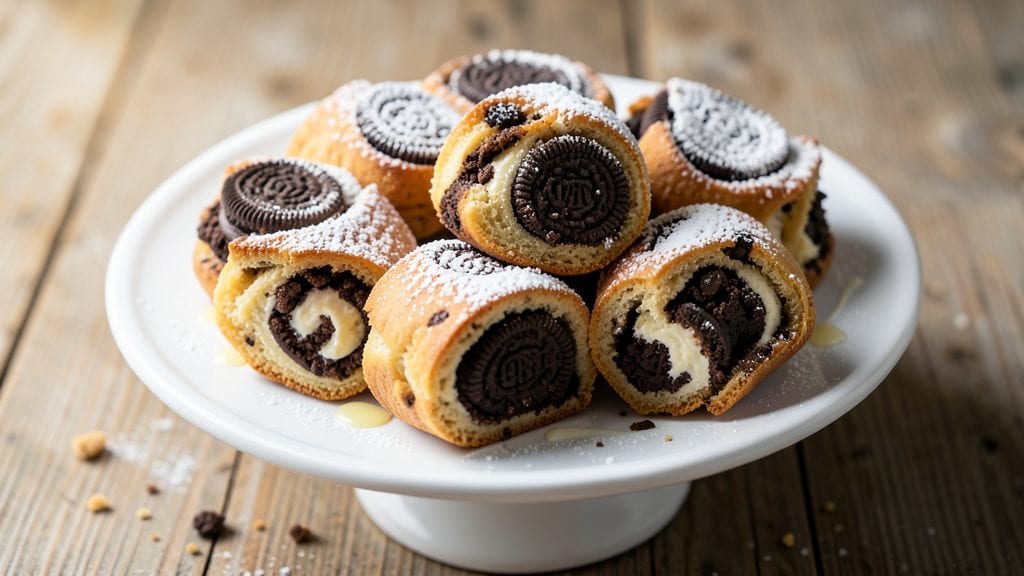
This Oreo rolls recipe delivers the perfect balance of chocolate swirls and creamy cream filling that’ll satisfy any sweet tooth craving. 💫 The secret lies in combining flaky, buttery dough with crushed Oreos and velvety cream cheese, then rolling it into golden, swirled perfection.
I’ve perfected this method over years of baking, ensuring every bite delivers that signature Oreo flavor with a tender, melt-in-your-mouth texture.
The process starts with a simple dough that’s rolled out, filled with a rich Oreo-cream mixture, then carefully swirled before baking. No special equipment is needed—just patience and precision for those iconic chocolate streaks.
The dough bakes up tender yet sturdy, while the cream filling stays luscious and never grainy, thanks to a precise ratio of cream cheese to crushed Oreos.
By the time these rolls emerge from the oven, you’ll have golden-brown pastries with visible chocolate swirls peeking through the creamy layers. The aroma alone will have everyone gathering around, and the first bite reveals that perfect harmony of crispy edges, soft dough, and rich Oreo flavor.
These aren’t just cookies—they’re a showstopping dessert that’s surprisingly simple to make.
Serve warm with a dusting of powdered sugar for an elegant touch, or pair with vanilla ice cream for an indulgent treat. The recipe makes about 12 rolls, perfect for parties or satisfying your own sweet cravings. Let’s get baking!
Ingredients for oreo rolls
Twelve golden rolls packed with swirled Oreo magic—just 11 simple ingredients.
| Ingredient | Amount | Notes |
|---|---|---|
| All-Purpose Flour 🌾 | 3 ½ cups | Sifted for flaky texture |
| Unsalted Butter 🧈 | 1 cup | Cold, cubed, unsalted |
| Granulated Sugar 🍚 | ¼ cup | For dough sweetness |
| Large Eggs 🥚 | 1 whole | Room temperature preferred |
| Vanilla Extract 🌸 | 1 tsp | Pure, high-quality extract |
| Salt 🧂 | ½ tsp | Fine sea salt preferred |
| Oreos 🍪 | 1 ½ cups | Crushed, classic flavor |
| Cream Cheese 🧀 | 8 oz | Full-fat, room temperature |
| Powdered Sugar 🍚 | ½ cup | For dusting and filling |
| Heavy Whipping Cream 🥛 | ½ cup | Cold for stability |
| Milk 🥛 | 1 tbsp | For dough flexibility |
The butter is non-negotiable here. Use European-style butter (like Plugrá or Land O’Lakes European) if you can—it’s higher fat and gives those flaky layers. Grab the coldest butter from the fridge, cube it, and don’t skip the chilling steps. The dough needs to rest twice: 30 minutes after mixing and another 30 before rolling. Trust me, it’s worth the wait. For the Oreos, classic flavor only—double-stuffed changes the texture. Crush them finely with a rolling pin or pulse in a food processor, but don’t overdo it or the filling gets grainy.
No vanilla extract? Vanilla bean paste works too—just use half the amount. The dough can handle a pinch of cinnamon if you’re feeling fancy, but keep it subtle. For the filling, cream cheese must be room temperature—cold lumps ruin everything. No heavy whipping cream? Whipped cream cheese plus powdered sugar is a decent swap, though it won’t be as rich. The milk in the dough? It’s a secret weapon for making the dough more pliable. Skip it if you’re in a rush, but your rolls will thank you.
These keep for 3 days in an airtight container at room temperature, but honestly? They disappear in minutes. For storage, wrap individually in parchment—prevents sogginess. Freeze unbaked dough balls for up to 2 months—just add 5-10 minutes to bake time. The filling can be prepped ahead too, but add it right before baking so the cream cheese stays smooth. Warm rolls taste best, so reheat in a 200°F oven for 5 minutes if they’ve gone cold.
Why You'll Love This Recipe
- No-Fuss Dough: I swear, this dough comes together faster than I can put on coffee. Just mix the butter, sugar, and eggs until it’s fluffy—no food processor, no fancy techniques—then fold in the flour and vanilla. Honestly, the hardest part is waiting for it to chill.
- Creamy Crunch Magic: That first bite of warm, buttery dough wrapped around a crisp Oreo? It’s the kind of contrast that makes you pause mid-chew. The vanilla in the dough ties everything together—sweet, rich, and just a little bit indulgent without being heavy.
- Breakfast or Dessert: Here’s what sold me—these rolls are both. Serve them warm with butter for a weekend brunch, or drizzle with chocolate ganache for a midnight treat. My kids ask for them at both meals, and I never have to argue about what’s for dinner.
- Leftovers Win: Between us, I make a double batch on Sundays. The rolls keep perfectly for three days in the fridge, reheat in seconds, and freeze like a dream. (Yes, even on a Tuesday night when you’re too tired to think.) Budget-friendly? Absolutely. The ingredients are basic, and a little goes a long way.
Step-by-step instructions for Oreo rolls recipe
Watch these decadent rolls transform from dough to swirl perfection—creamy, chocolatey, and irresistible!
👨🍳 Step 1: Create the Flaky Dough Base
In a large bowl, whisk together the 3.5 cups All-Purpose Flour, 0.25 cup Granulated Sugar, 0.5 tsp Salt, and 1 tsp Vanilla Extract. Cut in the 1 cup Unsalted Butter (cold and cubed) using a pastry cutter or your fingers until the mixture resembles coarse crumbs with pea-sized butter pieces. This ensures flaky layers later.
Add the 1 whole Large Eggs and 1 tbsp Milk, mixing just until the dough comes together. Here's the thing—don't overwork it! The dough should be soft but not sticky. Turn it out onto a lightly floured surface and knead gently for 30 seconds until smooth. Wrap in plastic and chill for 30 minutes—this prevents spreading and makes rolling easier.
🍳 Step 2: Roll and Fill with Oreo Magic
Preheat your oven to 350°F. On a floured surface, roll the chilled dough into a 12x15-inch rectangle (about ⅛-inch thick). Brush the entire surface with softened butter, leaving a ½-inch border uncovered. Sprinkle ½ cup Powdered Sugar evenly over the buttered area—this will caramelize beautifully.
Crush the 1.5 cups Oreos into fine crumbs (I pulse them in a food processor for even distribution). Spread the Oreo crumbs evenly over the powdered sugar, leaving that same ½-inch border. Roll the dough tightly into a log starting from the long side, pinching the seam to seal. Twist the log gently to create swirls—this is where the magic happens!
🔥 Step 3: Bake to Golden Perfection
Place the twisted log seam-side down on a parchment-lined baking sheet. Bake for 25-30 minutes until the rolls are golden brown and the internal temperature reaches 200°F. Here's what to watch for: the edges should be crisp, and you'll smell that irresistible Oreo-butter aroma filling your kitchen.
Let the rolls cool in the pan for 10 minutes before transferring to a wire rack. This resting time prevents them from falling apart when you slice. While they cool, make the cream filling—trust me, they'll be ready just in time!
🥘 Step 4: Whip Up the Cream Cheese Filling
In a medium bowl, beat the 8 oz Cream Cheese and 0.5 cup Powdered Sugar with an electric mixer until smooth. Add the 0.5 cup Heavy Whipping Cream and mix on high until soft peaks form. This should take about 2 minutes—don't rush it, or you'll end up with butter instead of creamy filling.
Once the rolls are completely cool, slice them into 12 equal pieces (about 1-inch thick). Spread a generous dollop of the cream cheese mixture between each layer, then seal the edges with a bit of extra filling. The contrast of warm, gooey cream between crispy Oreo layers is what makes these rolls legendary!
Pro Tips For Making Oreo Rolls
- CHILL THE DOUGH: I learned this the hard way—rolling out cold dough is a nightmare. After mixing the butter, sugar, and eggs, pop the dough in the fridge for at least 30 minutes. It’ll firm up just enough to handle without sticking everywhere (yes, even if you're impatient like me).
- CUT BUTTER IN SMALL: Don’t just dump the butter into the flour and hope for the best. Use a pastry cutter or two forks to break it into pea-sized pieces first—this ensures even distribution and prevents greasy pockets. I was skeptical until I tried it; the texture is noticeably better.
- ROLL EVEN THICKNESS: Uneven layers = uneven baking. Aim for a consistent ⅛-inch thickness when rolling out the dough. If it tears, patch it with extra dough—just press gently so it doesn’t rip again. This isn’t the prettiest method, but it’s the tastiest.
- USE ROOM-TEMP EGG: Cold eggs from the fridge will shock the dough and make it gummy. Let them sit out for 10–15 minutes before cracking them in—this guarantees a smoother batter and better rise. (Your future self will thank you.)
Dietary considerations for this oreo rolls
Gluten-Free Adaptation
For a gluten-free version, replace the all-purpose flour with a 1:1 gluten-free baking flour blend like Bob’s Red Mill or King Arthur. Add 1 tsp xanthan gum to help bind the dough—this is non-negotiable for structure.
The dough will be slightly more fragile, so handle it gently and avoid overworking. Chill the dough for 45 minutes instead of 30 to compensate for the lack of gluten elasticity. 💫
Dairy-Free Version
Swap the butter for 1 cup dairy-free margarine (like Earth Balance) or vegan butter (Miyoko’s brand works well). Use dairy-free cream cheese (Kite Hill or Violife) for the filling, and ensure your powdered sugar is also dairy-free.
The texture will be slightly less rich, but it still delivers that signature Oreo flavor. For extra creaminess, add 1 tbsp coconut cream to the filling mixture.
Nut-Free Safety
Oreos are naturally nut-free, but always double-check packaging for cross-contamination warnings. If you’re avoiding all traces of nuts, opt for a nut-free baking facility when purchasing Oreos.
For extra caution, make your own Oreo-like filling using chocolate sandwich cookies (like Enjoy Life brand) that are certified nut-free. The flavor stays just as delicious!
Lower Sugar Options
Reduce the granulated sugar in the dough by 2 tbsp and use 1 tbsp honey or maple syrup instead for natural sweetness. For the filling, replace 2 tbsp powdered sugar with 1 tbsp monk fruit sweetener (like Lakanto) to cut sugar while keeping the creamy texture.
The rolls will still taste rich but with a lighter touch—perfect for satisfying cravings without the sugar crash.
Vegan-Friendly Swaps
For a fully vegan version, use flaxseed meal (1 tbsp ground flax + 3 tbsp water) instead of the egg in the dough.
Replace the butter with vegan butter, and the cream cheese with cashew cream (blend 1 cup soaked cashews + 2 tbsp maple syrup + 2 tbsp lemon juice). The filling will be lighter but still luscious.
Bake at 325°F for 35-40 minutes—vegan dough needs extra time to set.
Nutrition facts
Frequently asked questions
Can I make these without a food processor for the Oreo crumbs?
Place 1.5 cups Oreos in a resealable bag and crush them with a rolling pin or heavy pan. For even finer crumbs, place them on a plate and press down firmly with a wine bottle. Just be patient—it takes a few minutes, but you’ll get that perfect texture without electricity.
Why did my rolls spread too much during baking?
This usually happens when the dough isn't chilled long enough or the butter melts too quickly. Always chill the dough for the full 30 minutes before rolling, and use cold butter. If your kitchen is warm, preheat the oven first and place the dough log on the middle rack where it’s hottest. A 350°F oven is ideal—don’t exceed 375°F or the butter will melt too fast.
How do I get the swirls to look perfect?
Start by rolling the dough tightly into a log, then gently twist it like a rope while keeping tension. For cleaner swirls, use a sharp knife to make a shallow cut along the length before twisting. After baking, slice the log at a slight angle for more dramatic spiral patterns. Pro tip: Brush the baked rolls with melted butter and dust with powdered sugar right after slicing for extra shine.
Can I make these ahead of time?
Yes! Assemble the unbaked dough log and refrigerate it overnight. Bake straight from the fridge—just add 5-10 minutes to the baking time. For the filling, whip it up fresh before serving, but you can prep the cream cheese mixture (without the whipped cream) up to 2 days ahead. Store baked rolls in an airtight container at room temperature for 3 days, or freeze the unbaked log for 2 months.
What’s the best way to serve these?
Warm rolls are ideal—reheat slices in a 200°F oven for 5 minutes to soften the cream filling. For a showstopper presentation, arrange them on a platter with a dusting of powdered sugar and fresh berries. Pair with vanilla ice cream or a scoop of whipped cream for an indulgent dessert. For a coffee twist, serve with a cup of espresso or chai tea.