Side Dishes
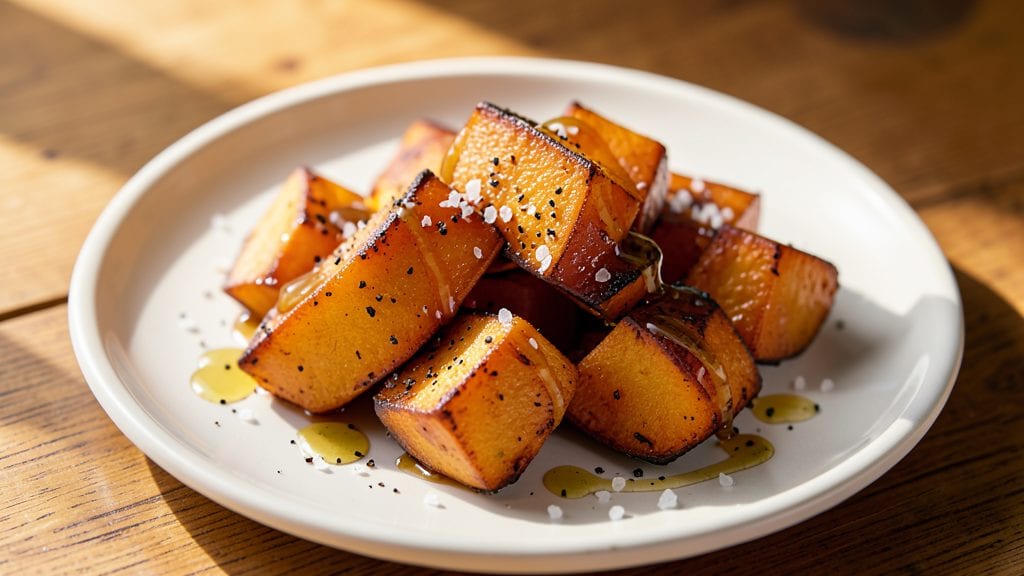
This simple butternut squash recipe transforms humble ingredients into a side dish so rich and caramelized, it could easily steal the show at any dinner table. The secret lies in high-heat roasting that concentrates natural sweetness while creating those coveted crispy edges—no fancy techniques required.
I developed this method after years of experimenting with different cuts and seasonings, and it consistently delivers restaurant-quality results with minimal effort.
What makes this recipe truly approachable is the foolproof technique that works whether you're a seasoned cook or just starting out. You'll need just five ingredients—butternut squash, olive oil, salt, pepper, and a touch of maple syrup for depth—and about 45 minutes of active time (mostly hands-off roasting).
The key is cutting the squash into even cubes so they cook uniformly, then roasting at 425°F until tender with caramelized edges that practically melt in your mouth.
By the time you're done, you'll have a dish that's naturally sweet, velvety, and packed with autumnal flavor—perfect for pairing with roasted meats, grilled chicken, or even as a standalone vegetarian main.
The aroma alone will have everyone gathering around your table, and the texture—tender yet slightly crisp—is impossible to resist. This is the kind of side dish that elevates any meal without requiring complicated steps.
Serve it warm alongside your favorite proteins or use it as a base for soups and stews. The beauty of this recipe is its versatility—it works equally well as a holiday centerpiece or a quick weeknight side. Here's how to achieve that perfect caramelized sweetness every time.
Ingredients for simple butternut
Five ingredients, one perfect roasted side that steals every meal show.
| Ingredient | Amount | Notes |
|---|---|---|
| Butternut Squash 🎃 | 1 ½ lb | Medium-sized, peeled and cubed |
| Extra-Virgin Olive Oil 🫒 | ¼ cup | High-quality, fruity variety |
| Pure Maple Syrup 🍯 | 1 tbsp | Grade B for deeper flavor |
| Diamond Crystal Kosher Salt 🧂 | ½ tsp | Fine grain preferred |
| Freshly Ground Black Pepper 🌶️ | ¼ tsp | Freshly cracked preferred |
The squash is your canvas here. Medium-sized butternut (about 1.5 lbs) gives you the best balance of sweetness and texture. Look for squash with a matte, vibrant orange skin—no soft spots or bruises. Most grocery stores carry them year-round, but local farmers markets in fall have the freshest, most flavorful ones. Peeled and cubed evenly (about 1.5-inch pieces), they'll roast to perfect caramelization. Pro tip: Cut them while still cold—it's safer and easier. If you can't find butternut, acorn or kabocha squash works just as well.
No maple syrup? Honey or brown sugar will work—just reduce the amount by half. The olive oil matters here: Use something fruity and high-quality—those cheap bottles won't give you the same depth of flavor. Freshly ground pepper is non-negotiable (pre-ground loses its punch fast), but if you're in a pinch, coarsely cracked pepper from a grinder is better than nothing. For extra richness, toss in 1 tbsp of unsalted butter during the last 5 minutes of roasting. And if you're feeling fancy, a pinch of smoked paprika adds a subtle depth that pairs perfectly with the caramelized sweetness.
Roasted squash keeps beautifully. Store in an airtight container for 5 days in the fridge—it actually tastes better the next day as the flavors meld. For longer storage, freeze portions for up to 3 months. I like to reheat it in a 350°F oven for 10 minutes with a splash of water to revive that crispy texture. This dish reheats like a dream, so double the batch—it disappears fast at holiday dinners or potlucks. The aroma alone will have everyone asking for seconds.
Why You'll Love This Recipe
- One-Pan Magic: The squash roasts right alongside the maple syrup—no flipping, no fuss. Just toss, roast, and let the oven do the work while you sip wine (or coffee, no judgment).
- Sweet-Savory Balance: That drizzle of maple syrup caramelizes into a glossy, sticky finish, while the olive oil keeps it rich and the pepper adds just enough bite. It’s like dessert met a cozy fall evening.
- Meal Prep Hero: Roast a big batch on Sunday, and you’ve got breakfast bowls, lunch sides, or a quick dinner for days. I’ve reheated mine straight from the fridge—still tender, still delicious.
- Budget Bright Spot: Butternut squash is cheaper than takeout, and these ingredients stretch far. Honestly, I’ve fed four people for under $10 with leftovers to spare—plus, the flavor feels luxurious.
Step-by-step instructions for roasted butternut squash
This method delivers perfectly caramelized squash with just five ingredients and minimal effort.
Preheat and Prepare the Squash
Preheat your oven to 400°F to ensure even cooking from the start. While it heats, arrange the 1.5 lb butternut squash cubes on a rimmed baking sheet, leaving about ½ inch between each piece. This spacing prevents steaming and promotes crisp edges.
Drizzle the squash evenly with the 0.25 cup extra-virgin olive oil, using your fingers to massage it into every surface. The oil's high smoke point ensures rich flavor without burning. I like to work in batches if needed—just don't overcrowd the pan.
Season Generously and Roast
Sprinkle the squash with the 0.5 tsp diamond crystal kosher salt and 0.25 tsp freshly ground black pepper, tossing gently to distribute evenly. The salt enhances natural sweetness while the pepper adds subtle complexity. Place the baking sheet on the middle rack where heat circulates most evenly.
Roast for 25-30 minutes, stirring once halfway through, until the edges turn golden brown and the squash yields slightly when pierced with a fork. Watch closely after 20 minutes—butternut squash burns quickly once caramelization begins. The interior should be tender with just a hint of resistance.
Add Sweetness and Caramelize
Remove the squash from the oven and drizzle each piece with the 1 tbsp pure maple syrup. Return to the oven immediately and roast for an additional 10-12 minutes until the syrup bubbles and darkens slightly, creating a glossy caramelized crust. This step transforms simple roasted squash into something restaurant-worthy.
For best results, use Grade B maple syrup here—its deeper flavor profile stands up to the roasting process. The syrup should coat the squash completely, with just enough time to caramelize without burning. You'll know it's perfect when the aroma fills your kitchen with warm, sweet notes.
Rest and Serve Warm
Transfer the roasted squash to a serving platter and let it rest for 5 minutes before serving. This brief rest allows the juices to redistribute, ensuring each bite is tender and flavorful. The exterior should be deeply caramelized with crisp edges, while the interior remains creamy and sweet.
Serve immediately while warm, pairing with crusty bread or as a side dish. The contrast between the caramelized exterior and tender interior makes this simple preparation feel like a gourmet creation. Store any leftovers in an airtight container for up to 3 days, though I rarely have any!
Pro Tips For Making Simple Butternut
- CUT THE SQUASH RIGHT: Use a sharp chef’s knife and cut the squash lengthwise first—then slice into wedges. I learned this the hard way after struggling to fit whole halves into a roasting pan. The wedges cook faster and more evenly, so they don’t turn to mush while the center stays raw.
- ROAST AT 400°F: Skip the low-and-slow approach—this isn’t a brisket. High heat (400°F) caramelizes the edges in 25-30 minutes, giving you that sweet, crispy texture you’re after. After burning three batches at 375°F, I finally cranked it up.
- SALT THE CUBES: Toss the cut squash with salt before roasting—it draws out moisture, so the edges crisp instead of steaming. I used to skip this, and the result was always sad, soggy cubes. Diamond Crystal kosher salt works best; use about ½ teaspoon per pound.
- MAPLE SYRUP AFTER: Drizzle the maple syrup after roasting, not before—it burns easily and makes the squash cloyingly sweet. A quick 2-tablespoon glaze over warm cubes lets the natural sugars shine. (Yes, even if you’re impatient like me, wait for it to cool slightly first.)
Storing and reheating this dish
Fridge Storage Tips
Store your roasted butternut squash in an airtight glass container (like Pyrex) to preserve its caramelized edges and creamy texture. I always let it cool completely before refrigerating—this prevents condensation that can make the pieces soggy.
The squash keeps beautifully for 5 days in the fridge, with flavors actually deepening over time as the spices meld. 🌱
Freezer-Friendly Method
For longer storage, freeze portions in single-serving portions using quart-sized freezer bags—this makes reheating a breeze. Squeeze out excess air to prevent freezer burn, and label with the date.
Frozen squash maintains quality for 3 months, though I recommend using it within 2 months for best texture. Thaw overnight in the fridge before reheating. ❄️
Oven Reheating
My preferred method is reheating in a 350°F oven for 10-12 minutes with a splash of water or broth (about 1 tbsp) to revive crispness. Spread the squash in a single layer on a baking sheet to prevent steaming.
For extra richness, add a pat of unsalted butter during the last 2 minutes of reheating. This restores that perfect caramelized crust while keeping the interior tender. 🔥
Microwave Shortcut
When you're short on time, the microwave works surprisingly well. Place squash in a microwave-safe dish with 1 tbsp water, cover loosely, and heat on high for 2-3 minutes.
Stir halfway, then continue in 30-second intervals until warmed through. The texture won't be as crisp, but it's a great option for quick lunches or last-minute servings. ⚡
Reviving Texture
If your reheated squash loses some crispness, don't worry—you can fix it! Pop it back in the oven at 400°F for 5-7 minutes until the edges crisp up again.
This works especially well if you're serving it as a side dish where presentation matters. A quick broil for 2-3 minutes also adds dramatic caramelization to any leftovers. 💫
Meal Prep Strategy
Double the batch for easy meal prep—I often roast 3 lbs of squash and divide it into 4 portions. Store three portions in the fridge and one in the freezer. This way, you always have a ready-made side for busy weeknights.
The squash reheats beautifully and pairs perfectly with proteins like roasted chicken or beef tenderloin. Plan to use your frozen portion within 2 months for optimal flavor. 📅
Nutrition facts
Frequently asked questions
Can I substitute maple syrup in this recipe?
Yes! If you don't have maple syrup, use 1 tbsp honey or 1 tsp brown sugar instead. The honey will add a slightly different depth of sweetness, while brown sugar creates a deeper caramelization. For best results, reduce the amount slightly to avoid over-sweetening.
How do I know when the butternut squash is perfectly cooked?
The squash is done when it's tender with slightly crisp edges and yields easily to a fork. Test by piercing a piece—if it slides off cleanly with minimal resistance, it's ready. Watch closely after 20 minutes to prevent burning, as caramelization happens quickly.
Can I make this recipe in an air fryer?
Toss cubed squash with 1 tbsp olive oil, salt, and pepper, then air fry at 375°F for 12-15 minutes, shaking halfway. For caramelization, spray with a light mist of water and air fry 2-3 minutes more until golden. The texture will be slightly crispier than oven-roasted but just as delicious.
What are the best ways to serve roasted butternut squash?
This versatile side pairs beautifully with almost anything! Try it alongside roasted chicken, turkey breast, or grilled salmon. For vegetarian meals, serve with crusty bread or over wild rice. It also works as a topping for flatbread or mixed into quinoa salads.
Why does my squash turn out watery or mushy?
Overcrowding the pan or undercooking are the most common causes. Always leave ½ inch between pieces and roast until tender with crisp edges. If using a smaller squash, reduce oven temperature to 375°F to prevent burning while ensuring even cooking.